
Creating an AI Tool can set your website apart from competition. Whether you are looking to increase traffic, attract potential customers or explore new revenue streams this could be a game changer. In this post, I will show you each step on how to create any AI tool. You will get to understand the fundamental structure of AI tools to incorporating API call Functions, designing and even optimizing this tool for great performance. By the end you will have a powerful AI tool like this one.
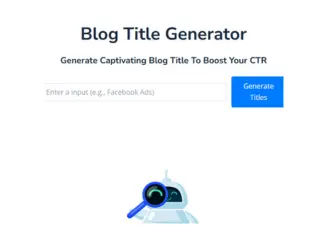
You can test it live here: Blog Title Generator
Ready to transform your WordPress site with AI tool? Let’s dive in and discover how!
Table of Contents
Understanding How The AI Tool Structure Works
Creating any AI tool on WordPress involves 4 stages. Below is a detailed step by step guide on how to create this tool.
1. Create a WordPress Page:
To begin, create a new page in your WordPress website that will host the AI tool. The user interface for utilizing the tool will be this page.
2. Add HTML Code:
The tool page is created by adding some HTML code. Communication with the Gemini API will begin at this stage.
3. Create a WordPress Function:
To receive user input from the HTML form and send it to Gemini API, build a custom WordPress function. This functionality establishes a communication channel between your website and Gemini.
4. Connect to Gemini API:
In response to user prompts, the WordPress function will establish a connection with Gemini API to generate text.
How to Get Gemini API Key:
A valid API access key is required before using any of AI API key models. Here’s how to carry it out:
Go to Gemini API page and “Sign in”.
You’ll be asked to register for an account. To finish the signup procedure, confirm your email.
Once logged in, on the side bar scroll to the Gemini API section, Click get an API key, Create new and you will get you key.
STEP 1.INCORPORATE THE API CALL FUNCTION
At this point, we’ll implement the PHP code that will enable our tool to communicate with the Gemini API. For this, we will make use of WordPress’s WPCode plugin.
What is the WPCode Plugin?
WPCode is a WordPress plugin that makes it simple and tidy to run PHP code snippets on your website. t eliminates the need to add customs code snippet in your theme’s functions.php file.
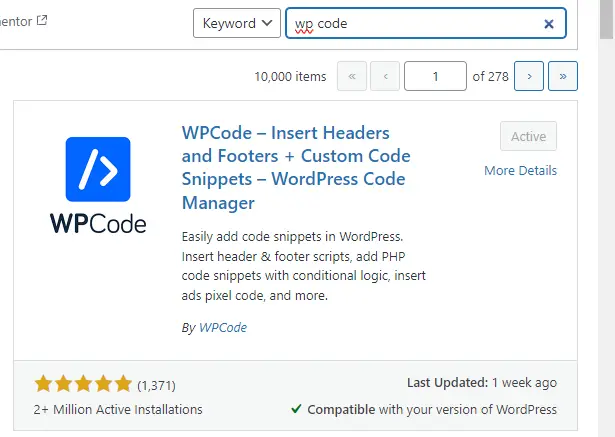
Installing and Activating the Code Snippets Plugin.
In your WordPress dashboard, go to ‘Plugins > Add New’
Enter ‘WPcode’ in the search bar.
Look for the plugin in the search results and click ‘Install Now’, then ‘Activate’.
Add the Gemini API Call.
Once you’ve activated the plugin, follow these 4 steps to add your API call:
- From your WordPress dashboard, navigate to ‘Code Snippets> Add New’.
- In the ‘Title’ field, give your new snippet a name, for example “Blog Title Generator”.
- On the dropdown on your right Set The Code Type to PHP.
- In the ‘Code’ text box, you’ll enter your PHP code. Here is an example of how you could write this code:
// Your Inputs
function setApiKey() {
    return "AIzaSyDglOmbRHDsylZ";//Replace with your actual Gemini API key
}

function setPrompt($input) {
    return "Generate 5 catchy blog titles for a blog post about " . $input;
}


// Define your "model" as an associative array
function createTitlesModel($titles) {
    return ["titles" => $titles];
}

// Helper JSON Functions
function modelToJson($modelInstance) {
    return json_encode($modelInstance);
}

function extractJson($textResponse) {
    $pattern = '/\{[^{}]*\}/';

    preg_match_all($pattern, $textResponse, $matches);
    $jsonObjects = [];

    foreach ($matches[0] as $jsonStr) {
        try {
            $jsonObj = json_decode($jsonStr, true, 512, JSON_THROW_ON_ERROR);
            array_push($jsonObjects, $jsonObj);
        } catch (JsonException $e) {
            // Extend the search for nested structures
            $extendedJsonStr = extendSearch($textResponse, $jsonStr);
            try {
                $jsonObj = json_decode($extendedJsonStr, true, 512, JSON_THROW_ON_ERROR);
                array_push($jsonObjects, $jsonObj);
            } catch (JsonException $e) {
                // Handle cases where the extraction is not valid JSON
                continue;
            }
        }
    }

    return !empty($jsonObjects) ? $jsonObjects : null;
}

function extendSearch($text, $jsonStr) {
    // Extend the search to try to capture nested structures
    $start = strpos($text, $jsonStr);
    $end = $start + strlen($jsonStr);
    $nestCount = 0;

    for ($i = $start; $i < strlen($text); $i++) {
        if ($text[$i] === '{') {
            $nestCount++;
        } elseif ($text[$i] === '}') {
            $nestCount--;
            if ($nestCount === 0) {
                return substr($text, $start, $i - $start + 1);
            }
        }
    }

    return substr($text, $start, $end - $start);
}

function jsonToModel($modelClass, $jsonData) {
    try {
        return $modelClass($jsonData);
    } catch (Exception $e) {
        echo "Validation error: " . $e->getMessage();
        return null;
    }
}

function validateJsonWithModel($modelClass, $jsonData) {
    $validatedData = [];
    $validationErrors = [];

    if (is_array($jsonData)) {
        foreach ($jsonData as $item) {
            try {
                $modelInstance = $modelClass($item);
                array_push($validatedData, $modelInstance);
            } catch (Exception $e) {
                array_push($validationErrors, ["error" => $e->getMessage(), "data" => $item]);
            }
        }
    } elseif (is_assoc($jsonData)) {
        try {
            $modelInstance = $modelClass($jsonData);
            array_push($validatedData, $modelInstance);
        } catch (Exception $e) {
            array_push($validationErrors, ["error" => $e->getMessage(), "data" => $jsonData]);
        }
    } else {
        throw new ValueError("Invalid JSON data type. Expected associative array or array.");
    }

    return [$validatedData, $validationErrors];
}

function is_assoc(array $arr) {
    if (array() === $arr) return false;
    return array_keys($arr) !== range(0, count($arr) - 1);
}

function generate_response_with_gemini($prompt) {

    $api_key = setApiKey();
    $api_url = 'https://generativelanguage.googleapis.com/v1beta/models/gemini-pro:generateContent?key=' . $api_key ;


    // Headers for the Gemini API
    $headers = [
        'Content-Type' => 'application/json'
    ];

    // Body for the Gemini API
    $body = [
        'contents' => [
            [
                'parts' => [
                    ['text' => $prompt]
                ]
            ]
        ]
    ];

    // Args for the WordPress HTTP API
    $args = [
        'method' => 'POST',
        'headers' => $headers,
        'body' => json_encode($body),
        'timeout' => 120
    ];

    // Send the request
    $response = wp_remote_request($api_url, $args);

    // Extract the body from the response
    $responseBody = wp_remote_retrieve_body($response);

    // Decode the JSON response body
    $decoded = json_decode($responseBody, true);

    // Extract the text
    if (isset($decoded['candidates'][0]['content']['parts'][0]['text'])) {
        $extractedText = $decoded['candidates'][0]['content']['parts'][0]['text'];
        return $extractedText;
    } else {
        return 'Text not found in response';
    }


}

function custom_tool_run() {


         // Add CORS headers
         header('Access-Control-Allow-Origin: *'); // Allows all origins
         header('Access-Control-Allow-Methods: GET, POST, OPTIONS'); // Specifies the allowed methods
         header('Access-Control-Allow-Headers: Content-Type, Authorization'); // Specifies the allowed headers


        // Variables
        $input = $_POST['input'];

        $basePrompt = setPrompt($input);


        // Creating an instance of your model
        $titlesModel = createTitlesModel(['title1', 'title2']);

        // Convert model instance to JSON
        $jsonModel = modelToJson($titlesModel);


        // Create optimized prompt
        $optimizedPrompt = $basePrompt . ". Please provide a response in a structured JSON format that matches the following model: " . $jsonModel;


        // Generate content using the modified prompt
        $gemeniResponse = generate_response_with_gemini($optimizedPrompt);

        // Extract and validate the JSON from the response
        $jsonObjects = extractJson($gemeniResponse);

        wp_send_json_success($jsonObjects);

        // Always die in functions echoing AJAX content
        wp_die();
}

add_action('wp_ajax_custom_tool_run', 'custom_tool_run');
add_action('wp_ajax_nopriv_custom_tool_run', 'custom_tool_run');
This function communicates with Gemini API to generate a text based on a prompt provided by the user.
NOTE: Remember to replace the Gemini API key in the double quotes as indicated in the code above.
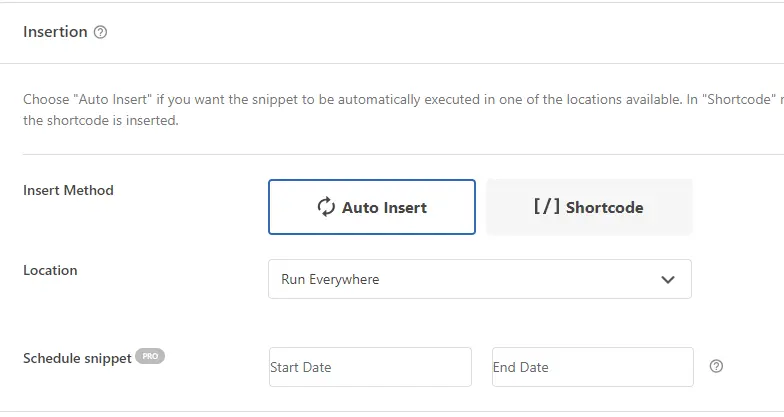
Publish The Code Snippet
Make sure to publish this script and set it to execute everywhere. as follows;
STEP2. DESIGN THE TOOL PAGE
Since we have our API function ready will create a new page on our WordPress site where we will add our AI tool.
Though there are many page builders, in this case I will be using Elementor, to create the page. The key point here is ability to add the custom HTML code into the page
Installing and Activating Elementor.
- From your WordPress dashboard, go to ‘Plugins > Add New’.
- In the search bar, type ‘Elementor‘.
- Find the plugin in the search results and click ‘Install Now’, then ‘Activate’.
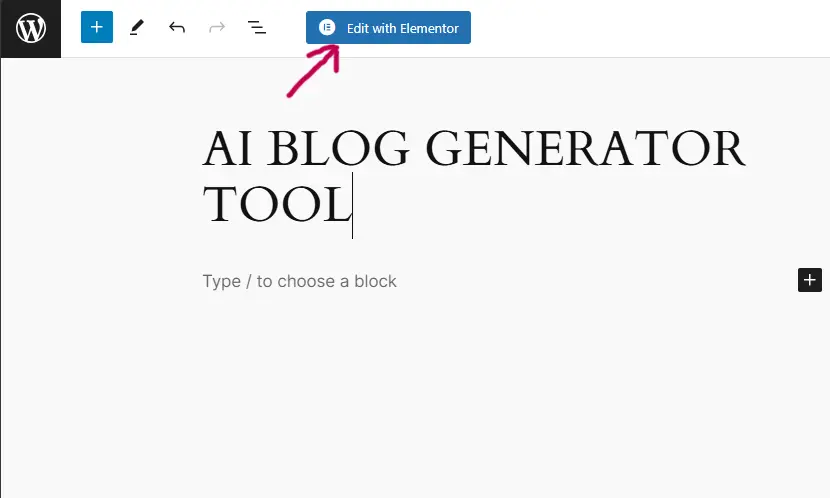
Creating a New Page with Elementor
- Navigate to ‘Pages > Add New’ from your WordPress dashboard.
- Enter a title for your page, such as “AI Tool”.
- Click on ‘Edit with Elementor‘ to start designing your page.
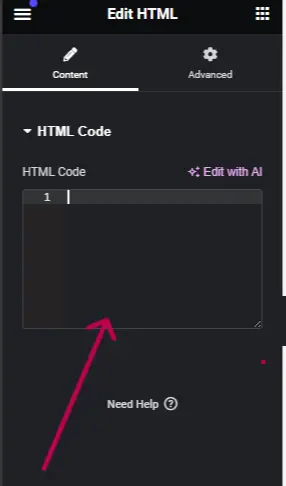
How to add Custom HTML In Elementor.
To add custom HTML in Elementor, you need to drag and drop the HTML Code widget into your page. Take the following steps:
- On the Elementor editor page, you’ll see a sidebar with several icons on the left. Click on the one that looks like a grid or matrix.
- This will open up a list of widgets that you can use. Look for the ‘HTML’ widget
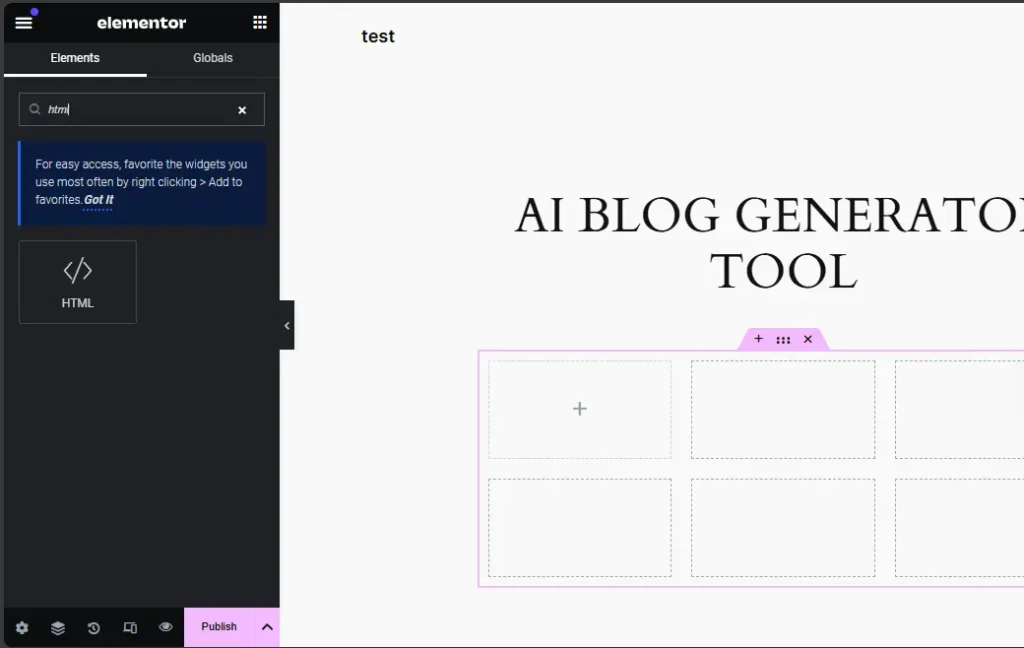
Paste your custom HTML code for your AI tool. In our case, it will include code for an input field, a button, and a text area for output results. In The figure below it shows where you will paste your code:
NOTE: To make things easier for you, I created the full HTML ,JS and CSS Code so that you can copy and paste it directly. This code is what is referred to as the (User Interface).Here it is
    <style>
        body {
            font-family: 'Segoe UI', Tahoma, Geneva, Verdana, sans-serif;
            background-color: #f4f4f4;
            color: #333;
            line-height: 1.6;
            padding: 20px;
        }

        .container {
            max-width: 600px;
            margin: auto;
            background: #fff;
            padding: 20px;
            border-radius: 8px;
            box-shadow: 0 2px 4px rgba(0, 0, 0, 0.1);
            text-align: center;
        }

        .input-group {
            display: flex;
            align-items: center;
            justify-content: space-between;
            margin-bottom: 20px;
        }

        input[type="text"] {
            flex-grow: 1;
            padding: 10px;
            border: 1px solid #ddd;
            border-radius: 4px;
            margin-right: 10px;
        }

        button {
            background: #007bff;
            color: #fff;
            border: 0;
            padding: 10px 20px;
            border-radius: 4px;
            cursor: pointer;
        }

        button:hover {
            background: #0056b3;
        }

        .result-item {
            background-color: #f2f2f2;
            margin-bottom: 10px;
            padding: 10px;
            border-radius: 5px;
            display: flex;
            align-items: center;
            justify-content: space-between;
        }

        .copy-button {
            background: #007bff;
            color: #fff;
            border: none;
            padding: 5px 10px;
            border-radius: 4px;
            cursor: pointer;
        }

        .copy-button:hover {
            background: #0056b3;
        }

        .image-container {
            margin-bottom: 20px;
        }

        @media screen and (max-width: 768px) {
            body, .container, .input-group {
                padding: 10px;
            }
        }
    .hidden {
            display: none;
        }
    </style>
</head>
<body>
    <div class="container">
        <div class="input-group">
            <input type="text" id="inputInput" placeholder="Enter a input (e.g., Facebook Ads)">
            <button id="generateButton">Generate Titles</button>
        </div>
        <div id="imageContainer" class="image-container">
            <img src="http://wordpress-test.local/wp-content/uploads/2024/03/get_started.png" alt="Getting Started" style="max-width: 100%;">
        </div>

        <ul id="titleList"></ul>


    </div>
By the way you can generate this code using any AI model either ChatGPT or copilot. Understanding how to communicate with AI models, such as ChatGPT, is one of the most in-demand skills now and in the future, since the possibilities with these models are practically endless. This skill is called “prompt engineering“. If interested you can check on how to create or generate prompts, click here.
After pasting your code, Click ‘Update’ to save your changes. The next step will be connecting this page to our API function.
STEP 3.Connect the Page with API Function
In this step its where JavaScript (JS) comes in. JavaScript connects our API function and the tool page.
Purpose of this JavaScript
This JS code sets up an event listener on the ‘Generate’ button so that when the button is clicked, it collects the topic selected by the user and sends it to our Gemini API function using AJAX.
While the titles are being generated, it shows a loading spinner. Once the titles are returned, it hides the loading spinner and displays it in a text area in the result.
If there’s an error at any point, it shows an error message in the result text area.
The code also sets up an event listener on the ‘Copy’ button so that when clicked, it copies the generated story to the clipboard.
Note: Just after the code in step 2. Copy this code Here it is:
    <script>
        document.addEventListener('DOMContentLoaded', function() {
            const generateButton = document.getElementById('generateButton');
            const titleList = document.getElementById('titleList');
            const inputInput = document.getElementById('inputInput');
            const imageContainer = document.getElementById('imageContainer');

            generateButton.addEventListener('click', function() {
                const input = inputInput.value;
                if (!input) {
                    alert('Please enter a input.');
                    return;
                }

                imageContainer.innerHTML = '<img src="http://test.local/wp-content/uploads/2024/03/loading.webp" alt="Loading" style="max-width: 20%;">'; // Replace 'http://wordpress-test.local/wp-content/uploads/2024/03/loading.webp' with your loading GIF

        // Clear existing titles and show the loading GIF
                titleList.innerHTML = '';
                imageContainer.classList.remove('hidden');

                fetch('http://wordpress-test.local/wp-admin/admin-ajax.php', {
                    method: 'POST',
                    headers: {
                        'Content-Type': 'application/x-www-form-urlencoded'
                    },
                    body: 'action=custom_tool_run&input=' + encodeURIComponent(input)
                })
                .then(response => response.json())
                .then(jsonResponse => {
                    titleList.innerHTML = '';
                    if (jsonResponse.success) {
                        const titles = jsonResponse.data[0].titles;

                        titles.forEach(title => {
                            let listItem = document.createElement('li');
                            listItem.className = 'result-item';
                            listItem.innerHTML = `<span>${title}</span> <button class="copy-button" onclick="copyToClipboard('${title}')">Copy</button>`;
                            titleList.appendChild(listItem);
                        });
                        imageContainer.classList.add('hidden'); // Hide the image container
                    } else {
                        console.error('Failed to fetch titles');
            imageContainer.innerHTML = '<img src="http://test.local/wp-content/uploads/2024/03/error_image.png" alt="Error" style="max-width: 100%;">' +
                                               '<p>Oops! Something went wrong. Please try again.</p>';                   }
                })
                .catch(error => {
                    console.error('Error:', error);
                    imageContainer.innerHTML = '<img src="http://test.local/wp-content/uploads/2024/03/error_image.png" alt="Error" style="max-width: 100%;">' +
                                               '<p>Oops! Something went wrong. Please try again.</p>';

                });
            });

            window.copyToClipboard = function(text) {
            var textArea = document.createElement("textarea");
            textArea.value = text;
            textArea.style.top = "0";
            textArea.style.left = "0";
            textArea.style.position = "fixed";
            document.body.appendChild(textArea);
            textArea.focus();
            textArea.select();

            try {
                var successful = document.execCommand('copy');
                var msg = successful ? 'successful' : 'unsuccessful';
                alert('Copying text was ' + msg);
            } catch (err) {
                alert('Unable to copy text');
                console.error('Unable to copy', err);
            }

            document.body.removeChild(textArea);
        };

        });
    </script>
That’s it! Save and publish. Visitors should be able to use your tool page, which is now connected to the Gemini API function, based on the keyword they select.
You can test it live here: Blog Title Generator
Optimize The Tool.
Even after our tool is operational, the process continues. It’s time to start optimizing. This can be anything from improving the user interface (UI) to including security features like captcha.
You can also build any AI tool since now you get the concept. Take for example this line of code from the Gemini API call function: Here it is:
function setPrompt($input) {
    return "Generate 5 catchy blog titles for a blog post about " . $input;
}
From the above you can tweak this line to something more professional you can add two inputs or instead of saying “Generate 5 catchy blog titles for a blog post about” you could say “Generate 5 catchy You tube titles about” or use a more advanced prompt to be unique and stand out in the competition.
Finally, keep in mind that continual improvement and upgrading your product based on user input is the key to making it more user-friendly and successful.
Benefits of Creating AI Online Tool
AI tool is one of the best growth hacks ever.
Increased traffic
Interaction: With the aid of these tools, visitors to your website may engage in more interaction and stay longer.
SEO Advantages: More organic traffic to your website can result from this kind of engaging content since it raises its search engine ranking.
Share ability: Users are more likely to share your tool on social media if it offers value, which broadens its audience.
Lead magnets
Segmentation: You may target your audience more precisely with marketing by breaking down the way users interact with your tool.
Develop Trust: Providing a useful item for free or as a trial can increase visitor trust and loyalty and turn them into devoted customers or subscribers.
Monetization
Subscription Models: On your website, you can set up a members-only area where users can access your AI tools exclusively. Plugins like:
- ProMembership: This plugin is perfect for setting up tiered memberships because it lets you offer access at different levels according to the subscription plan, which opens up opportunity for varied price points.
- MemberPress: This is well-known for being user-friendly, allows you to limit access to particular pages or whole content categories. For access, you can set up recurring subscriptions or one-time payments.
Ad Revenue and Affiliate Marketing: In case the product draws a sizable user population, you can make money by charging customers indirectly through affiliate marketing or specifically targeted ads. Use advertising networks that are relevant to your audience or collaborate with partners in the sector.
Creating a SaaS with WordPress: By combining the aforementioned techniques, WordPress can effectively be used to create a Software as a Service (SaaS) platform. Take advantage of several plugins to establish a smooth workflow, incorporate payment methods, and offer your users a polished, business-like experience.
It is possible and potentially very profitable to monetize your AI tool using WordPress. You can select the approach that best fits your objectives and the demands of your users from a variety of solutions designed to accommodate various tools and target groups.
Conclusion
Creating an AI tool with is a smart approach to improve your website’s functionality and user engagement. By understanding the AI tool structure, incorporating API call functions, designing an intuitive tool page, connecting the page with the API, and optimizing the tool, you can create a valuable asset for your site. This not only increases traffic and acts as a lead magnet but also opens up new monetization opportunities.
Ready to take your WordPress site to the next level with an AI tool? Start today and watch your traffic and engagement increase! What kind of AI tool would you like to create for your website? Share your ideas in the comments below!


Hey! Would you mind if I share your blog with my myspace group?
There’s a lot of folks that I think would really enjoy your content.
Please let me know. Many thanks